
Полное руководство по MAC-адресам ESP32/ESP8266: чтение, изменение и применение (Arduino IDE)
Controlling your smart home devices, managing a fleet of sensors, or troubleshooting network conflicts often starts with one crucial piece of information: the MAC Address. This unique identifier is the key to advanced network management for your ESP32 и ESP8266 boards.
This definitive guide will not only show you how to read and change the MAC Address of your ESP boards using the Arduino IDE but, more importantly, will explain the critical “why” and “when” behind doing so. You’ll learn practical applications, essential security and legal considerations, and gain expert insights to manage your IoT projects like a pro.
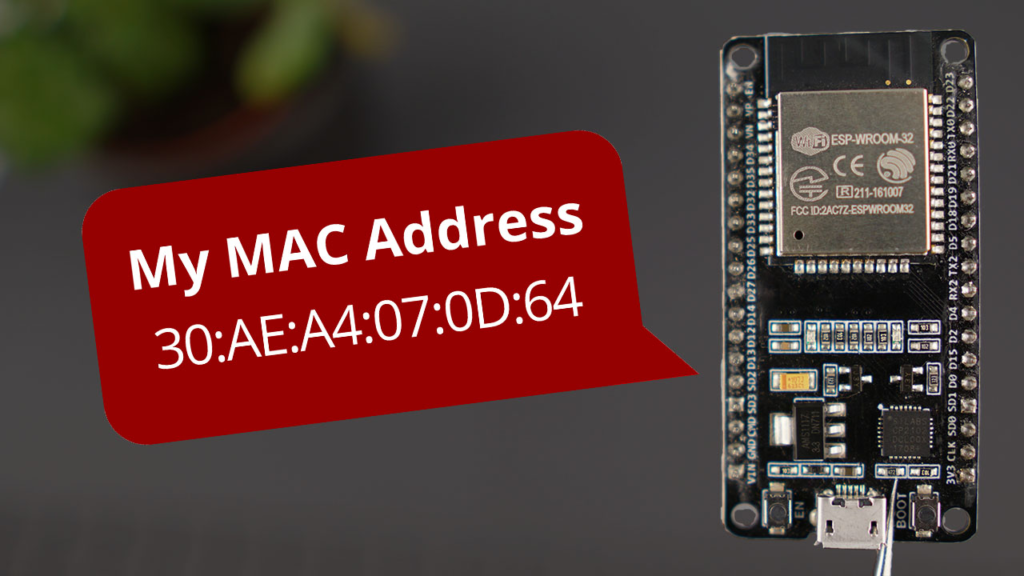
1. Understanding the MAC Address: Your Device’s Network ID
A MAC Address (Media Access Control Address) is a globally unique identifier assigned to the network interface controller (NIC) of your device. Think of it as a permanent serial number for network communication, hardcoded by the manufacturer onto the device’s hardware.
-
Format: It consists of six groups of two hexadecimal digits, separated by colons (e.g.,
30:AE:A4:07:0D:64). -
Structure: The first three bytes (OUI – Organizationally Unique Identifier) identify the manufacturer (e.g., Espressif systems). The last three bytes are assigned uniquely by the manufacturer to that specific device.
-
Функция: At the most fundamental level of your local network (Ethernet, Wi-Fi), devices use MAC addresses, not IP addresses, to find and communicate with each other. Your router uses it to assign IPs via DHCP and for network access control lists.
2. Why Read or Change a MAC Address?
Understanding the purpose is crucial before implementation.
Reasons to READ the MAC Address:
-
Network Administration: Identify specific ESP boards on your router’s client list for monitoring or troubleshooting.
-
Security: Create a whitelist on your router, allowing only devices with known MAC addresses to connect.
-
Device Identification: In projects with multiple ESP units, use the MAC address as a unique ID in your code or data logs.
-
Obtaining Initial Network Info: It’s the first step in network-related programming.
Reasons to CHANGE the MAC Address (Spoofing/Cloning):
-
Testing & Development: Simulate multiple devices with a single board when testing server or network applications.
-
Privacy Concerns: On public Wi-Fi, using a random MAC can reduce persistent tracking (note: ESP boards can do this programmatically for networks).
-
Bypassing Network Restrictions: Some networks restrict access based on MAC. Cloning an approved address can be a workaround (use responsibly and ethically).
-
Replacing Hardware: If a device fails, you can program its replacement with the same MAC address to seamlessly take its place in the network without reconfiguring routers or servers.
⚠️ Critical Legal & Ethical Warning: Changing a MAC address (“spoofing”) can violate the terms of service of some internet providers or be used for unauthorized network access. Always ensure you have explicit permission to modify network settings on any network you do not own. This guide is for educational and legitimate development purposes.
3. How to Get the ESP32 MAC Address
The following Arduino sketch uses the esp_wifi.h library to reliably fetch the MAC address. This method is preferred for its direct access to the ESP32‘s WiFi functions.
/*
 * ESP32 - Read Default MAC Address
 * Complete Project: https://RandomNerdTutorials.com/
 */

#включать <WiFi.h>
#включать <esp_wifi.h> // Required for direct MAC access

пустота настраивать() {
  Серийный номер.начинать(115200);
  задерживать(1000); // Short startup delay

  Wi-Fi.mode(WIFI_STA); // Set WiFi to Station mode
  Wi-Fi.начинать(); // Initiate WiFi (no connection needed for MAC)

  uint8_t macAddr[6]; // Array to hold the 6-byte MAC
  esp_err_t result = esp_wifi_get_mac(WIFI_IF_STA, macAddr);

  если (result == ESP_OK) {
    Серийный номер.печать("ESP32 MAC Address: ");
    // Print MAC in standard XX:XX:XX:XX:XX:XX format
    Серийный номер.printf("%02X:%02X:%02X:%02X:%02X:%02X\n",
                  macAddr[0], macAddr[1], macAddr[2],
                  macAddr[3], macAddr[4], macAddr[5]);
  } еще {
    Серийный номер.println("Error: Could not read MAC Address.");
  }
}

пустота петля() {
  // Nothing here
}
Upload & Verify:
-
Upload the code to your ESP32.
-
Откройте Последовательный монитор (Tools > Serial Monitor) at a baud rate of 115200.
-
Нажмите Кнопка EN/RST on the board.
-
Your unique MAC address will be displayed.
4. How to Set a Custom MAC Address on ESP32
Важный: Changing the MAC address this way is volatile. It will revert to the factory-default address after a hard reset or power cycle unless you reprogram it. You must include the MAC-setting code in every sketch where you need the custom address.
Key Technical Rule: Он least significant bit (LSB) of the first byte of a custom MAC address must be 0. This bit indicates whether the address is unicast (0) or multicast (1). A simple rule: ensure the first hex digit is even (0, 2, 4, 6, 8, A, C, E). For example, 0x3A... is valid, 0x3B... is not.
Here is the complete code to read the default address, set a new one, and verify the change.
/*
 * ESP32 - Set a Custom MAC Address
 * Complete Project: https://RandomNerdTutorials.com/
 */

#включать <WiFi.h>
#включать <esp_wifi.h>

// >>> DEFINE YOUR CUSTOM MAC ADDRESS HERE <<<
// Format: {0xXX, 0xXX, 0xXX, 0xXX, 0xXX, 0xXX}
// First byte LSB must be 0 (first hex digit must be even).
uint8_t newMACAddress[] = {0x32, 0xAE, 0xA4, 0x07, 0x0D, 0x66};

// Optional: Your WiFi Credentials to test connection with new MAC
константа чар* SSID = "YOUR_NETWORK_SSID";
константа чар* пароль = "YOUR_NETWORK_PASSWORD";

пустота printMacAddress() {
  uint8_t currentMac[6];
  esp_wifi_get_mac(WIFI_IF_STA, currentMac);
  Серийный номер.printf("%02X:%02X:%02X:%02X:%02X:%02X\n",
                currentMac[0], currentMac[1], currentMac[2],
                currentMac[3], currentMac[4], currentMac[5]);
}

пустота настраивать() {
  Серийный номер.начинать(115200);
  задерживать(1000);

  Wi-Fi.mode(WIFI_STA);
  Серийный номер.печать("[1] Default MAC Address: ");
  printMacAddress();

  // --- CHANGE THE MAC ADDRESS ---
  esp_err_t setResult = esp_wifi_set_mac(WIFI_IF_STA, &newMACAddress[0]);
  если (setResult == ESP_OK) {
    Серийный номер.println("[2] MAC Address change successful.");
  } еще {
    Серийный номер.println("[2] ERROR: Failed to set MAC Address.");
    пока (1) задерживать(100); // Halt on critical error
  }

  Серийный номер.печать("[3] New MAC Address:      ");
  printMacAddress();
  Серийный номер.println();

  // --- OPTIONAL: Connect to WiFi with the new MAC ---
  Серийный номер.println("[4] Attempting to connect to WiFi...");
  Wi-Fi.начинать(SSID, пароль);
  пока (Wi-Fi.статус() != WL_CONNECTED) {
    задерживать(500);
    Серийный номер.печать(".");
  }
  Серийный номер.println("\n[5] Connected! New IP Address: " + Wi-Fi.локальный IP().toString());
}

пустота петля() {
  // Ваш основной код здесь
}
5. ESP8266 NodeMCU: Get and Change MAC Address
The process for the ESP8266 is similar but uses different library functions. The ESP8266WiFi library has built-in methods.
Get ESP8266 MAC Address:
#включать <ESP8266WiFi.h>
пустота настраивать() {
  Серийный номер.начинать(115200);
  Серийный номер.печать("ESP8266 MAC Address: ");
  Серийный номер.println(Wi-Fi.macAddress()); // Simple one-liner
}
пустота петля() {}
Change ESP8266 MAC Address:
#включать <ESP8266WiFi.h>
// Define your custom MAC (same rules apply)
uint8_t newMAC[] = {0x32, 0xAE, 0xA4, 0x07, 0x0D, 0x66};

пустота настраивать() {
  Серийный номер.начинать(115200);
  Wi-Fi.mode(WIFI_STA);
  Серийный номер.печать("[OLD] MAC: ");
  Серийный номер.println(Wi-Fi.macAddress());

  // Use the low-level 'wifi_set_macaddr' function
  wifi_set_macaddr(STATION_IF, &newMAC[0]);

  Серийный номер.печать("[NEW] MAC: ");
  Серийный номер.println(Wi-Fi.macAddress());
}
пустота петля() {}
6. Advanced Applications & Expert Tips
Moving beyond basics, here’s how to leverage MAC addresses in real-world projects.
1. Generating “Legal” Random MACs:
For testing, you might need to generate valid, non-conflicting MAC addresses.
пустота generateRandomMAC(uint8_t* macArray) {
  randomSeed(analogRead(0)); // Seed with "noise"
  для (инт i = 0; i < 6; i++) {
    macArray[i] = random(0, 256);
  }
  // Enforce Unicast (LSB of first byte = 0) and Locally Administered (second LSB = 1)
  macArray[0] = (macArray[0] & 0xFE) | 0x02; // Mask ensures 0x02, 0x06, 0x0A, etc.
}
2. Using MAC as a Unique Device ID in IoT Projects:
Instead of hard-coding identifiers, use the MAC.
Нить getDeviceID() {
  uint8_t mac[6];
  Wi-Fi.macAddress(mac);
  чар deviceId[13]; // 12 hex chars + null terminator
  sprintf(deviceId, "%02X%02X%02X%02X%02X%02X", mac[0], mac[1], mac[2], mac[3], mac[4], mac[5]);
  возвращаться Нить(deviceId); // Returns a 12-character string like "30AEA4070D64"
}
// Use this ID in MQTT client names, HTTP headers, or database records.
3. Factory MAC vs. Active MAC (Crucial for Debugging):
Remember, the esp_wifi_get_mac() function returns the currently active address, which may be your custom one. The factory MAC is stored in the ESP’s EFUSE memory. If you need the permanent factory MAC even after a spoof, you must read it from EFUSE (advanced technique requiring specific ESP-IDF commands).
7. Troubleshooting Common Issues
| Проблема | Вероятная причина | Решение |
|---|---|---|
esp_wifi_set_mac() fails |
Invalid MAC format (first byte LSB = 1). | Ensure the first hex byte is an even number (e.g., 0x3A, not 0x3B). |
| WiFi fails to connect after change | Router has MAC filtering or old DHCP binding. | 1. Disable MAC filtering on the router temporarily. 2. Restart the router to clear old DHCP lease. 3. Ensure your custom MAC is a valid unicast address. |
| MAC reverts after reboot | This is expected behavior. The change is not permanent to hardware. | You must include the esp_wifi_set_mac() function call in your настраивать() for it to take effect on every boot. |
ESP8266 wifi_set_macaddr not found |
Outdated board package in Arduino IDE. | Update your ESP8266 board package via Boards Manager. Use the latest stable version. |
| Address conflicts on network | Two devices with the same MAC address. | Never set the same custom MAC on two devices active on the same network. Use randomization or careful management. |
Conclusion & Best Practices
You now have complete control over the network identity of your ESP32 и ESP8266 boards. To use this power effectively and responsibly, follow these final guidelines:
-
Document Everything: Keep a log of your ESP boards’ factory MAC addresses and any custom ones you assign. This is vital for inventory and debugging.
-
Test Thoroughly: Always test MAC address changes in a controlled, isolated network environment before deploying to a production setting.
-
Prioritize Security: Do not rely on MAC address filtering as a sole security measure. MAC addresses can be spoofed, as you’ve just learned. Use it in conjunction with WPA2/WPA3 encryption and strong passwords.
-
Understand Permanence: Accept that software-based MAC changes are temporary. For a permanent change, you would need to burn the address into EFUSE—a risky, irreversible process not covered here and generally not recommended.
By mastering your device’s MAC address, you unlock a deeper level of network integration and project flexibility. Whether for simplifying device management, enhancing privacy, or scaling your testing environment, this knowledge is a fundamental tool in the IoT developer’s toolkit.
======================================