
Полное руководство по цифровым GPIO ESP32: освоение входов и выходов с помощью Arduino IDE
If you’re starting with the ESP32, mastering digital GPIO (General Purpose Input/Output) pins is your essential first step toward building any IoT project. This comprehensive guide will take you beyond basic examples to truly understand how to read button presses, control LEDs, and utilize the ESP32‘s versatile pin configuration for real-world applications.
Why Digital GPIOs Are Fundamental to ESP32 Projects
Every ESP32 project—from simple LED blinkers to complex home automation systems—relies on digital inputs and outputs. Digital pins detect binary states (pressed/released, on/off) and control digital devices. With approximately 34 usable GPIO pins (with limitations), the ESP32 offers tremendous flexibility for connecting sensors, actuators, displays, and communication modules.
Key Advantages of ESP32 Digital GPIOs:
-
Flexible pin assignment: Most pins can be configured as either inputs or outputs
-
Built-in pull-up/pull-down resistors: Eliminate the need for external resistors in many cases
-
High drive capability: Can source/sink sufficient current for LEDs and relays
-
Interrupt capability: Respond instantly to input changes without constant monitoring
Hardware Overview: Understanding ESP32 Pin Limitations
Before connecting any components, it’s crucial to know which pins are truly available. Not all ESP32 pins behave equally:
Restricted Pins to Avoid
-
GPIOs 6-11: Internally connected to the ESP32‘s SPI flash memory. Using these can crash your program.
-
GPIOs 34-39: Input-only pins. Cannot be used as outputs or with internal pull-up/pull-down resistors.
-
Strapping pins (GPIOs 0, 2, 4, 5, 12, 15): Affect boot behavior—use cautiously during development.
Versatile Digital Pins
Most other GPIOs (0-5, 12-19, 21-23, 25-27, 32-33) work as both digital inputs and outputs. For beginners, GPIOs 4, 5, 18, and 19 are excellent starting points as they lack special restrictions.
Core Functions for Digital I/O Programming
The Arduino IDE provides three essential functions for digital GPIO control:
1. pinMode(pin, mode) – Pin Configuration
Sets a GPIO as either INPUT или ВЫХОД. Always configure pins in your настраивать() function before using them.
Common mistake: Forgetting to set pin mode, which leads to unpredictable behavior.
2. digitalWrite(pin, value) – Controlling Outputs
Sets an output pin to either ВЫСОКИЙ (3.3V) or НИЗКИЙ (0V).
// Turn on an LED connected to pin 5
digitalWrite(5, ВЫСОКИЙ);

// Turn it off
digitalWrite(5, НИЗКИЙ);
3. digitalRead(pin) – Reading Inputs
Returns ВЫСОКИЙ или НИЗКИЙ based on the voltage detected at an input pin.
// Read a button state
инт buttonState = digitalRead(4);
Practical Example: LED Control with Push Button
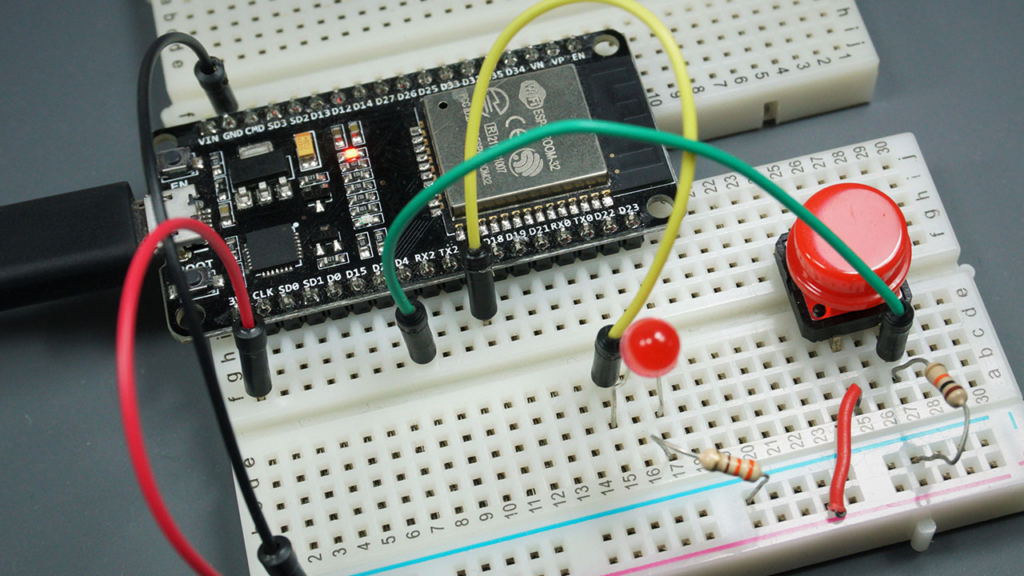
Let’s build on the basic “button controls LED” circuit with enhanced functionality and debugging.
Enhanced Circuit Diagram
-
ВЕЛ: Connect anode (long leg) to GPIO 5 through a 220Ω resistor, cathode to GND
-
Push button: Connect one terminal to GPIO 4, other terminal to 3.3V
-
Crucial addition: Add a 10kΩ pull-down resistor between GPIO 4 and GND
-
This ensures a clean LOW signal when button isn’t pressed
-
Prevents “floating” inputs that randomly toggle between HIGH/LOW
-
Professional-Grade Code with Debugging
// Complete ESP32 Digital I/O Example with Serial Monitoring
// https://RandomNerdTutorials.com/esp32-digital-inputs-outputs-arduino/

// Pin definitions
константа инт BUTTON_PIN = 4;   // Pushbutton connected to GPIO 4
константа инт LED_PIN = 5;      // LED connected to GPIO 5

// Variables
инт lastButtonState = НИЗКИЙ;   // Previous button reading
инт buttonPressCount = 0;    // Track number of button presses
без подписи длинный lastDebounceTime = 0;
без подписи длинный debounceDelay = 50;  // Debounce time in milliseconds

пустота настраивать() {
  Серийный номер.начинать(115200);
  Серийный номер.println("ESP32 Digital I/O Example Initialized");

  // Configure pins
  pinMode(BUTTON_PIN, INPUT);
  pinMode(LED_PIN, ВЫХОД);

  // Initialize LED state
  digitalWrite(LED_PIN, НИЗКИЙ);

  Серийный номер.печать("Monitoring button on GPIO ");
  Серийный номер.println(BUTTON_PIN);
}

пустота петля() {
  // Read current button state
  инт currentButtonState = digitalRead(BUTTON_PIN);

  // Debounce logic: check if button state has changed
  если (currentButtonState != lastButtonState) {
    lastDebounceTime = миллис();
  }

  // Only register press after debounce period
  если ((миллис() - lastDebounceTime) > debounceDelay) {
    // If button state changed to HIGH (pressed)
    если (currentButtonState == ВЫСОКИЙ && lastButtonState == НИЗКИЙ) {
      buttonPressCount++;
      Серийный номер.печать("Button pressed! Total presses: ");
      Серийный номер.println(buttonPressCount);

      // Toggle LED state
      digitalWrite(LED_PIN, !digitalRead(LED_PIN));

      // Report LED status
      если (digitalRead(LED_PIN) == ВЫСОКИЙ) {
        Серийный номер.println("LED turned ON");
      } еще {
        Серийный номер.println("LED turned OFF");
      }
    }
  }

  // Save current state for next loop comparison
  lastButtonState = currentButtonState;

  // Small delay to prevent overwhelming the serial monitor
  задерживать(10);
}
Code Explanation: Beyond the Basics
-
Debouncing: Mechanical buttons physically “bounce” when pressed, creating multiple rapid state changes. Our debouncing logic waits 50ms after a change before registering it.
-
Serial debugging: Provides real-time feedback in the Serial Monitor—invaluable for troubleshooting.
-
Toggle logic: Each button press alternates the LED state rather than requiring constant pressure.
-
Efficient polling: Uses
millis()for timing instead of blockingdelay()calls.
Advanced Input Techniques
Using Internal Pull-up Resistors
For simpler wiring, use the ESP32‘s built-in pull-up resistors:
// Enable internal pull-up resistor
pinMode(BUTTON_PIN, INPUT_PULLUP);

// Button logic reverses with INPUT_PULLUP:
// Button pressed = LOW (connects to GND)
// Button released = HIGH (pulled up to 3.3V)
С INPUT_PULLUP, connect your button between the GPIO pin and GND (not 3.3V).
Pin State Change Interrupts
For immediate response without constant polling:
// Attach interrupt to pin
attachInterrupt(digitalPinToInterrupt(BUTTON_PIN), buttonPressed, CHANGE);

// Interrupt Service Routine (must be fast!)
пустота buttonPressed() {
  // Handle button change here
}
Warning: Keep ISR code extremely short—avoid Serial.print() or complex operations.
Real-World Application: Smart Button with Multiple Functions
Transform the basic example into a practical smart home component:
// Smart button with press duration detection
пустота петля() {
  инт buttonState = digitalRead(BUTTON_PIN);

  если (buttonState == ВЫСОКИЙ) {
    // Button is pressed - time the duration
    без подписи длинный pressStart = миллис();

    пока (digitalRead(BUTTON_PIN) == ВЫСОКИЙ) {
      // Wait for button release
      задерживать(10);
    }

    без подписи длинный pressDuration = миллис() - pressStart;

    // Different actions based on press length
    если (pressDuration < 50) {
      // Ignore - likely noise
    }
    еще если (pressDuration < 500) {
      Серийный номер.println("Short press - toggle light");
      // Toggle light code here
    }
    еще если (pressDuration < 3000) {
      Серийный номер.println("Medium press - dim light");
      // Dimming function here
    }
    еще {
      Серийный номер.println("Long press - factory reset");
      // Reset function here
    }
  }
}
Устранение распространенных проблем
1. Unstable/Noisy Input Readings
Симптомы: Random HIGH/LOW fluctuations without button press
Решения:
-
Always use pull-up or pull-down resistors (internal or external)
-
Add a 0.1µF capacitor between input pin and GND
-
Implement software debouncing as shown above
2. ESP32 Won’t Upload Code
Симптомы: “Failed to connect” errors during upload
Решения:
-
Hold the BOOT button when upload begins
-
Check Tools > Board selection matches your ESP32 модель
-
Try different USB cables (some charge-only cables don’t transmit data)
3. LED Doesn’t Light/Is Very Dim
Решения:
-
Verify LED orientation (long leg to positive)
-
Ensure resistor value is appropriate (220-470Ω)
-
Check you’re writing
ВЫСОКИЙto the correct pin
4. WiFi Interference with GPIOs
Critical note: When WiFi is active, avoid using GPIOs 6-11, 16, 17. For ADC2 pins (GPIOs 0, 2, 4, 12-15, 25-27), you may experience conflicts when using WiFi simultaneously.
Expanding Your Project: Next Steps
Once you’ve mastered basic digital I/O, explore these related concepts:
-
Analog Inputs: Read variable voltages with
analogRead()for sensors like potentiometers -
PWM Output: Simulate analog output with
analogWrite()for LED fading, motor control -
Touch Sensing: Use ESP32‘s built-in capacitive touch sensors on designated pins
-
Multiple Devices: Learn I2C and SPI communication to connect many sensors to few pins
Essential Best Practices
-
Always initialize pins в
настраивать()before using them inпетля() -
Include current-limiting resistors for LEDs (220Ω-1kΩ)
-
Use descriptive variable names (
ledPinнетpin13) -
Implement debouncing for all mechanical switches
-
Test each component separately before combining complex circuits
-
Document your pin assignments with comments or diagrams
From Learning to Application
This digital I/O foundation enables countless ESP32 projects:
-
Home automation: Light controls, security sensors, smart switches
-
IoT devices: Button-controlled webhooks, status indicators
-
Робототехника: Limit switches, motor controllers, sensor arrays
-
Prototyping: User interfaces, debug indicators, mode selectors
Remember: Every complex ESP32 project builds upon these basic digital input/output concepts. Start simple, master the fundamentals, and gradually add complexity.
Need Help? If your circuit isn’t working:
-
Double-check all connections against the schematic
-
Verify your GPIO numbers match the physical pins
-
Check the Serial Monitor for debugging messages
-
Ensure power is connected (USB or external 5V)
Share Your Project! Modified the code for your own use? Created an interesting application? Share your experiences in the comments to help other makers learn from your journey.
Ready to advance? Explore our ESP32 GPIO Reference Guide for complete pin details and special functions, or check out our ESP32 PWM tutorial for motor and LED dimming control.
======================================