Полное руководство по управлению ШИМ (широтно-импульсной модуляцией) на ESP32
Он Микроконтроллер ESP32 is a powerhouse for Интернет вещей and embedded systems projects, renowned for its robust feature set and wireless capabilities. One of its most fundamental and powerful tools for interacting with the analog world is Pulse Width Modulation, or PWM.
While a digital pin can only be ON (5V/3.3V) or OFF (0V), many components like LEDs, servos, and motors require variable voltage or precise timing for control. This is where the ESP32‘s PWM capabilities excel. This tutorial will provide an in-depth exploration of how to harness the ESP32‘s PWM functionality, from basic concepts to advanced implementation.
Understanding the Core Concept of PWM
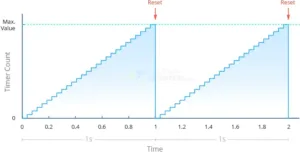
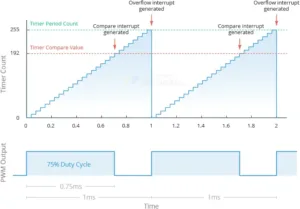
Pulse Width Modulation is not a true analog signal. Instead, it is a digital technique to simulate an analog result by rapidly switching a digital signal on and off. The key parameters are:
Частота: The number of complete on/off cycles per second (Hz). A higher frequency means the cycle repeats faster.
Duty Cycle: The percentage of one period where the signal is HIGH (ON). A 0% duty cycle is always OFF, a 100% duty cycle is always ON, and a 50% duty cycle is ON half the time.
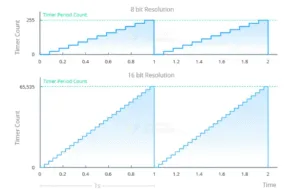
Разрешение: The precision with which the duty cycle can be set. It is expressed in bits. A higher resolution allows for finer control over the pulse timing.
The average voltage delivered to a load is directly proportional to the duty cycle. By varying the duty cycle, we effectively control the average power.
Unlike simpler microcontrollers (e.g., Arduino UNO) which may have a limited number of hardware PWM pins, the ESP32 is incredibly flexible. Its key features include:
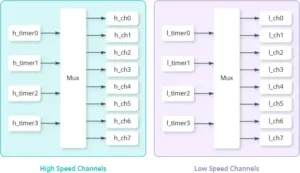
Dedicated LED PWM Controller: The ESP32 has a dedicated hardware module specifically for generating PWM signals, ensuring consistent and glitch-free operation without CPU intervention.
High Resolution: It supports up to 16-bit resolution, allowing for extremely fine control (65,536 discrete duty cycle levels).
High Frequency: It can generate signals with frequencies up to tens of kHz, which is essential for applications like driving brushless DC motors or switching power supplies efficiently.
Pin Flexibility: Almost any GPIO pin can be configured as a PWM output, providing tremendous design flexibility.
The Arduino IDE analogWrite() function is not natively available for ESP32 in the same way. Instead, we use the ESP32-specific LED Control (LEDC) functions.
The setup process involves two main steps: configuration and output.
The utility of PWM extends far beyond dimming lights:
Servo Motor Control: Servos use PWM pulses of a specific duration (typically 1-2ms) within a 20ms period to determine their angle. The ESP32’s high resolution allows for very precise servo positioning.
DC Motor Speed Control: Coupled with an H-Bridge motor driver IC (like the L298N), PWM is the standard method for controlling the speed and direction of DC motors.
Audio Generation: By generating PWM signals at audio frequencies (20Hz – 20kHz) and filtering the output with a low-pass filter, the ESP32 can synthesize simple tones and sounds.
Power Regulation: PWM is the cornerstone of modern switched-mode power supplies (SMPS) and voltage regulators, allowing for highly efficient power conversion.
Заключение
Mastering Pulse Width Modulation is a critical skill for anyone working with the ESP32. Its dedicated hardware, high resolution, and pin flexibility make it superior to many other microcontrollers for generating precise digital control signals. By understanding the ledcSetup(), ledcAttachPin(), и ledcWrite() functions, you can unlock a world of possibilities, from creating simple lighting effects to building complex robotic systems. Integrate these techniques into your next ESP32 project to achieve professional-grade control over analog devices.
С 2016 года, ESP32S.com Наша компания превратилась в полноценного партнера по экосистеме для вашего развития в сфере Интернета вещей. Расположенная в Шэньчжэне, глобальном центре инноваций в электронике, мы помогли сотням разработчиков и компаний реализовать свои проекты. ESP32Воплощаем идеи в жизнь. Наша команда стремится оказывать исключительную поддержку и предлагать инновационные решения, которые помогут вам достичь ваших целей в области Интернета вещей.
В ESP32S.com, мы осваиваем тонкости разработки ESP32Разработка продукта, основанного на концепции, включает в себя множество этапов, от разработки до вывода на рынок. Именно поэтому мы предлагаем комплексные решения, охватывающие весь жизненный цикл продукта. ESP32Устройства на базе [технологии]. Независимо от того, нужна ли вам помощь в проектировании печатных плат, создании прототипов, производстве или даже маркетинге и доставке, мы вам поможем.
Свяжитесь с нами
Готовы вывести свой IoT-проект на новый уровень? Свяжитесь с ESP32S.com Узнайте больше о наших комплексных решениях уже сегодня! ESP32Устройства на базе [технологии]. Позвольте нам стать вашим надежным партнером в воплощении ваших инновационных идей в жизнь. Свяжитесь с нами прямо сейчас для начала.